Blog

Orca Slicer: Complete Guide to Getting Started

Orca Slicer: Complete Guide to Getting Started

Orca Slicer: Complete Guide to Getting Started

Orca Slicer is emerging as an essential tool in the 3D printing landscape. Derived as a fork from Bambu Studio and developed by SoftEver, this software stands out for its advanced and intuitive features, designed to simplify the slicing process and optimize print results.


The popularity of Orca Slicer has grown rapidly due to its similarities with PrusaSlicer and Bambu Studio, along with numerous improvements and new features that make it unique in its kind.


In this article, we will dive into everything you need to know to get started with Orca Slicer: from the initial setup to its most distinctive features, we will guide you step by step to make the most of this innovative software.

What is Orca Slicer


In the constantly evolving world of 3D printing, Orca Slicer stands out as a versatile and advanced solution. This software not only makes the slicing process more accessible for beginners but also offers sophisticated options designed to meet the needs of more experienced users.


Thanks to its intuitive interface, wide compatibility with various printer models and materials, and advanced features, Orca Slicer proves to be an essential tool. The support of an active community, along with frequent updates and analysis and visualization features, further enhances its utility and reliability.


Back to Table of Contents

Main Features of Orca Slicer


Intuitive Interface

Orca Slicer offers a user-friendly interface, designed to make the software accessible even to beginners. Each feature is clear and well-organized, allowing a gradual approach to more advanced settings.


Wide Compatibility

The software supports a wide range of 3D printers and materials, making it extremely versatile. From the most common models to the most innovative filaments, Orca Slicer guarantees maximum flexibility.


Advanced Features

Experienced users can take advantage of tools like detailed slicing settings control, customizable supports, and advanced modes to optimize prints.


Community Support

An active and passionate community regularly contributes to the improvement of the software, adding new profiles and features. Additionally, forums, Discord groups, and dedicated subreddits are available.


Visualization and Analysis Tools

Orca Slicer integrates advanced tools to visualize and analyze the 3D model before printing. This reduces errors and allows for higher quality prints.


Back to Table of Contents

How to Install Orca Slicer


Orca Slicer is compatible with major operating systems, including Windows, macOS, and Linux. While no specific technical requirements are listed, the installation instructions vary depending on the operating system and are provided in detail on the GitHub platform.


By following the simple instructions from SoftFever, the software installation is quick and intuitive.


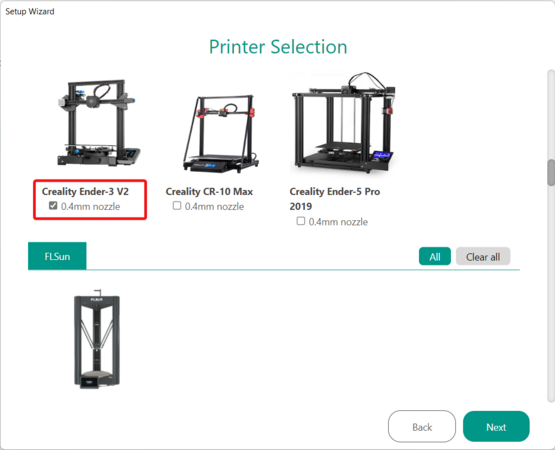
Once the installation is complete, Orca Slicer provides numerous pre-configured profiles for a wide range of 3D printers, regularly updated by the community.


To start using the software, you need to select your printer profile and the type of filament you wish to use. The basic setup mode is set by default, but more advanced users can switch to advanced mode to take advantage of more complex features.


Here’s a guide for setting up Orca Slicer upon first launch:


1. Select Your Printer Profile:

Choose your printer model from the list of pre-set profiles to get the ideal settings for your machine.

OrcaSlicer profile

2. Set the Materials:

Define the types of filament you intend to use, adjusting parameters such as extrusion temperature and print speed.


3. Check the Default Settings:

Review and, if necessary, modify the default settings such as layer thickness, infill, and print speed.


4. Run a Test Print:

Once the setup is complete, run a test print to monitor and, if necessary, refine the settings.


5. Explore the Advanced Mode:

Once you're comfortable with the basic settings, you can access advanced mode to further customize the slicing process.

By following these simple steps, you'll be able to make the most of Orca Slicer’s features, optimizing your 3D printing workflow.


Back to Table of Contents

How to Use Orca Slicer


Once Orca Slicer is properly installed and configured, it is ready to be used. Let’s explore the interface to better understand how it works.


1. Menu Bar

In the Orca Slicer interface, the house-shaped icon allows you to start new projects or open existing ones.

The "Prepare View" section lets you adjust and optimize the settings for printing. After performing the slicing, you can access the "Preview" section to view information such as filament consumption, estimated print time, and any warnings or errors.


The "Device" section provides an overview of the printer interface, which can be connected via Wi-Fi.


Finally, "Project" is an advanced feature of Orca Slicer, integrated with Bambu Studio, that allows you to manage large projects. Here you can add images, documents, and a list of materials used.


2. Printer Selection

To start the slicing process, first select the printer you want to use. Through the Wi-Fi icon, you can connect the machine (visible in the "Device" section). If you're using a Bambu Lab printer, you can choose the type of build platform.


3. Filament Configuration

In the "Filament" section of Orca Slicer, select the type of filament you want to use and customize its settings. The software offers some default configurations, ideal as a starting point, which can be modified later to optimize the results. By default, only one filament is enabled, but if you're using a printer with multiple extruders or the Bambu Lab AMS multicolor system, you can add additional filaments by clicking the "+" symbol.


With the Bambu Lab AMS system, Orca Slicer will automatically detect the available filaments and allow you to manage purge filament for each color change.


4. Print Settings

The "Process" section of Orca Slicer is divided into two main tabs and five categories of settings to configure the printing process:


  1. Quality: Allows you to modify the line height and width, as well as the seam position.
  2. Strength: Settings dedicated to configuring walls, shells, and infill.
  3. Speed: Controls print speed, accelerations, and jerk parameters.
  4. Support: Useful for prints with overhanging parts, it allows you to adjust supports, including floating base supports.
  5. Other Settings: Includes options for bed adhesion and managing multicolor prints.

Settings can be configured globally or per individual object.


5. Slicing and Printing

In the "Slice & Print" section, the "Slice" button starts the slicing process. Once completed, the software will automatically direct you to the "Preview" tab, where you can verify the details of the process. When slicing is ready, the "Print" button will turn green, allowing you to send the file directly to the connected printer to start the print. Alternatively, you can export the G-code file to save it on your device.


6. Using the Toolbar

The Orca Slicer toolbar offers various useful icons, such as "Add" to insert new parts onto the print bed, and basic commands like "Move" and "Rotate." The software also includes additional tools like "Add Plate" to manage parts of more complex projects, the bucket icon for multicolor printing, and the puzzle icon to view project assembly. These features are particularly advantageous for complex printing projects.


With these options, Orca Slicer allows you to easily manage all aspects of 3D printing, optimizing the workflow for high-quality results.


Back to Table of Contents

Exclusive Features of Orca Slicer


Orca Slicer, the evolution of Bambu Studio, stands out in the world of slicing software thanks to innovative features. One of the main ones is the ability to print overhangs without the use of supports, slightly modifying the model's geometry. This option is ideal for printing decorative objects, such as miniatures, but caution is needed for functional applications.


Another interesting feature is the "Mouse Ears," a type of brim designed to prevent warping. Orca Slicer automatically adds them, but also allows users to customize them according to their needs.


Additionally, Orca Slicer's calibration section is particularly advanced, offering a variety of automatic tests and detailed guides to optimize print settings and ensure perfect results.


Back to Table of Contents

The Orca Slicer Community


The Orca Slicer community is growing rapidly, becoming one of the most appreciated slicers in the current landscape. With its constantly increasing number of users, they can take advantage of numerous educational resources to improve their experience. In addition, there is an active Discord server with nearly 6,000 members, ready to provide immediate support.


On the Orca Slicer GitHub repository, there is a "Discussions" section that serves as a forum-like space for user interaction. For those more familiar with Reddit, there is also a dedicated subreddit for Orca Slicer.


Our Italian community is no exception: our forum is buzzing with a series of very active discussions on Orca Slicer, full of practical tips and solutions to common problems.


Back to Table of Contents

Conclusion


Orca Slicer is an essential tool for anyone who wants to get the most out of 3D printing. Thanks to its simplicity and power, it allows you to easily transform your ideas into real objects. Whether you're a beginner or an expert, Orca Slicer has everything you need to improve your experience.


Back to Table of Contents

You must be logged in to post comments

Megamenu

Sign in

Your cart

There are no more items in your cart